未開封のmicro:bitが手元にずっとありましたので、少し時間が出来たので触ってみました。
micro:bitはLEDで文字や絵を表現できるドットマトリックスの他、加速度センサや圧電ブザー、有線通信ではi2cやSPI、UART、micro pythonのradioモジュールを使用した簡単な無線通信機能等の機能を搭載しています。
これだけ機能があれば色々出来そうですが、 まだいまいち使い方が分かっていないので、とりあえずドットマトリックスの簡単な制御をしてみる事にしました。
ただ単に、micro:bit単体で点灯させるのも寂しいですので、今回は下記のような流れでRaspberry Piからmicro:bitのLEDを制御させてみたいと思います。↓
Raspberry Pi(Apach WEBサーバー/html→js→cgi(python)でGPIO操作) ⇒ micro:bit(0~2入力のHIGH,LOWでプログラムを走らせる)
目次
初めに
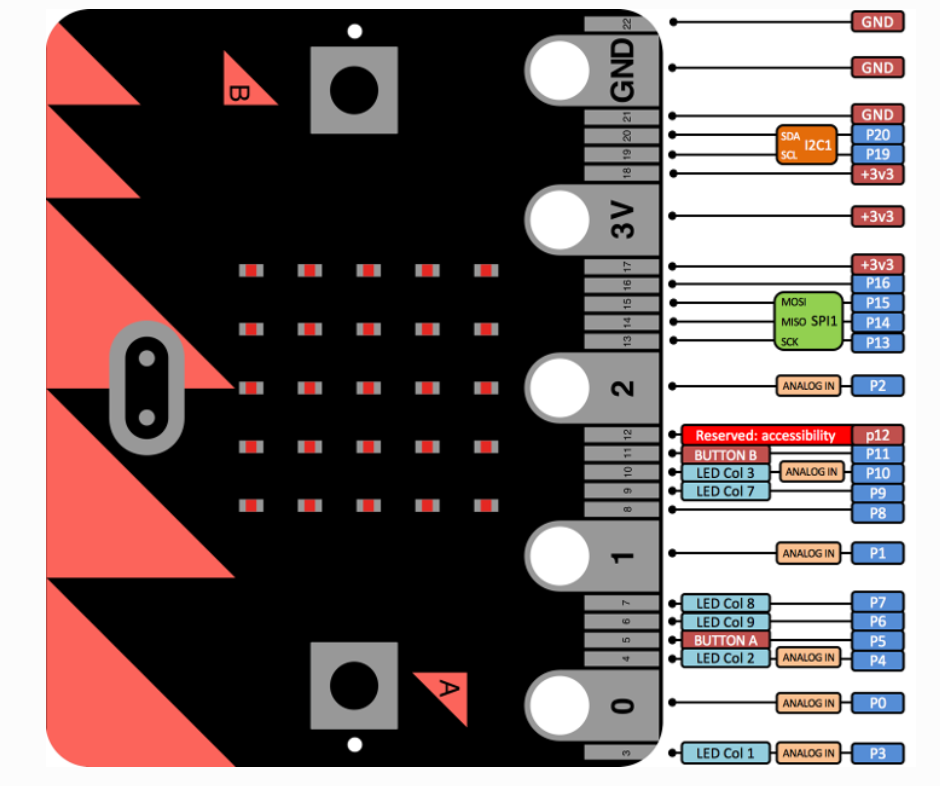
micro:bitの入出力端子

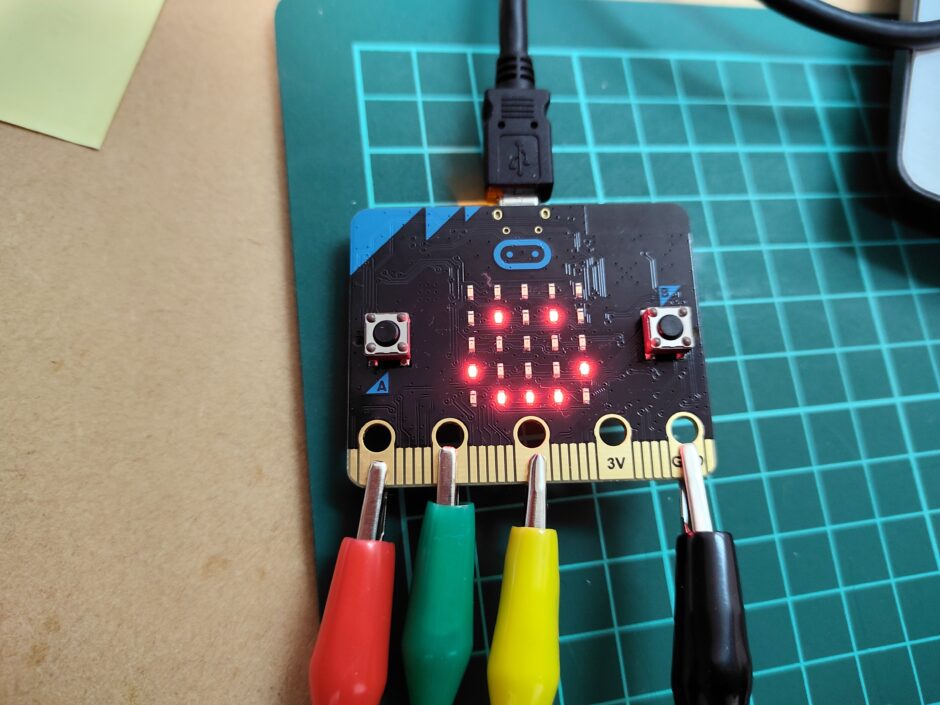
端子のいくつかは他の端子よりも大きいので、ワニ口クリップを取り付けられます。大きい端子には 0, 1, 2, 3V, GND のラベルが付いています。今回は0~2の3つを使い、ここの入力信号を変化させて(Raspberry PiのGPIO信号)それに応じたプログラムを走らせます。
micropythonについて
micro:bitはmicropythonで開発が出来ます。さらにmicrobit専用のモジュールが用意されているので、手軽に色々な機能が扱えます。
下記サイトにてチュートリアルがありますので、是非参考にして下さい。↓
BBC micro:bit Micro Python チュートリアル
下準備
今回、ブラウザからRaspberry PiのGPIOを制御しますので、Raspberry PiにWEBサーバーを立てる必要があります。
Pythonでは簡易的に使えるhttp.serverがありますが、Apacheを使う事にしました。(どちらでもいいですが。)
また、CGIを使ってjsからpythonを操作する仕組みにしますので、CGIの設定も必要です。
ApacheのインストールやCGIの設定については過去記事でまとめていますので、そちらを参考にして下さい。↓
最後にmicro:bitのIDEをインストールしておきます。私はMu Editorを使用しました。
それではまずRaspberry Piのプログラムから作成します。
Raspberry Pi ZERO W
html/css
|
1 2 3 4 5 6 7 8 9 10 11 12 13 14 15 16 17 18 19 20 21 22 23 24 25 26 27 28 29 30 31 32 33 34 35 |
<!DOCTYPE html> <html lang="ja"> <head> <meta charset="utf-8"> <title>テスト</title> <meta name="viewport" content="width=device-width, initial-scale=1"> <link rel="stylesheet" href="style.css"> </head> <body> <main> <ul> <div class="bc"> <div class="b"> <li id="left" class="ledoff">1</li> </div> <div class="n"> <li id="forward" class="ledoff">2</li> </div> <div class="c"> <li id="right" class="ledoff">3</li> </div> </div> </ul> </main> <script src="https://ajax.googleapis.com/ajax/libs/jquery/3.1.0/jquery.min.js"></script> <script src="main.js"></script> </body> </html> |
|
1 2 3 4 5 6 7 8 9 10 11 12 13 14 15 16 17 18 19 20 21 22 23 24 25 26 27 28 29 30 31 32 33 34 35 36 37 38 39 40 41 42 43 44 45 46 47 48 49 50 51 52 53 54 55 56 57 58 |
* { margin: 0px; padding: 0px; } body { max-width: 600px; font-size: 25px; width: 100%; height: 100vh; -webkit-touch-callout: none; -webkit-user-select: none; } main { height: 100vh; background: skyblue; } ul { display: block; list-style: none; height: 100vh; } .bc { display: flex; height: 20vh; } .a ,.bc, .d, .n { height: 12vh; } li { width: 100px ; height: 100px; margin-left: auto; margin-right: auto; background: yellow; margin-top: 250px; line-height: 100px; } .b { margin-left: auto; } .c { margin-right: auto; } .n { margin-right: auto; margin-left: auto; } ul li { text-align: center; } .a li, .b li, .c li, .d li, .n li { border: solid 1px; } .ledon { background: #f88888; } a:active { color: #ff2020; } |
続いてjs
javascript
|
1 2 3 4 5 6 7 8 9 10 11 12 13 14 15 16 17 18 19 20 21 22 23 24 25 26 27 28 29 30 31 32 33 34 35 36 37 38 39 40 41 42 43 44 45 46 47 48 49 50 51 52 53 54 55 56 57 58 59 60 61 62 63 64 65 66 67 68 69 70 71 72 73 74 75 76 77 78 79 80 81 82 83 84 85 86 87 88 89 90 91 92 93 94 95 96 97 98 99 100 101 102 103 |
$(function(){ let motor = "STOP"; // 関数:モーターを動かすマクロ呼び出し function change_motor(typee) { motor = typee; if(typee == "FOWARD") { //0 //w().callMacro('FW'); console.log(typee); $.ajax({ url: 'cgi-bin/recieve.py', type: 'post', data: {name: 'hhhhh' } }).done(function(data){ console.log(data); }).fail(function(){ console.log('failed'); }); } else if(typee == "RIGHT") { //1 //w().callMacro('RT'); console.log(typee); $.ajax({ url: 'cgi-bin/recieve.py', type: 'post', data: {name: 'jjjj' } }).done(function(data){ console.log(data); }).fail(function(){ console.log('failed'); }); } else if(typee == "LEFT") { //2 //w().callMacro('LT'); console.log(typee); $.ajax({ url: 'cgi-bin/recieve.py', type: 'post', data: {name: 'kkkk' } }).done(function(data){ console.log(data); }).fail(function(){ console.log('failed'); }); } else if(typee == "STOP") { //stop //w().callMacro('ST'); console.log(typee); $.ajax({ url: 'cgi-bin/recieve.py', type: 'post', data: {name: 'ssss' } }).done(function(data){ console.log(data); }).fail(function(){ console.log('failed'); }); } } // 「前進」ボタンが押されたときのイベント処理 $('#forward').bind('touchstart', function() { // 押されたとき if(motor == 'STOP') { $(this).addClass('ledon'); change_motor('FOWARD'); } }).bind('touchend', function() { // 離したとき $(this).removeClass('ledon'); change_motor('STOP'); }); // 「右」ボタンが押されたときのイベント処理 $('#right').bind('touchstart', function() { if(motor == "STOP") { $(this).addClass('ledon'); change_motor('RIGHT'); } }).bind('touchend', function() { $(this).removeClass('ledon'); change_motor('STOP'); }); // 「左」ボタンが押されたときのイベント処理 $('#left').bind('touchstart', function() { if(motor == "STOP") { $(this).addClass('ledon'); change_motor('LEFT'); } }).bind('touchend', function() { $(this).removeClass('ledon'); change_motor('STOP'); }); }); |
※過去に作成したラジコンのプログラムを応用しているため、文字列に方向が入っていますが気にしないでください。
続いてPython CGIスクリプト
python
|
1 2 3 4 5 6 7 8 9 10 11 12 13 14 15 16 17 18 19 20 21 22 23 24 25 26 27 28 29 30 31 32 33 34 35 36 37 38 39 |
#!/usr/bin/python3 # -*- coding: utf-8 -*- import cgi import RPi.GPIO as GPIO GPIO.setmode(GPIO.BCM) MOTOR_A1 = 13 MOTOR_A2 = 19 MOTOR_A3 = 26 GPIO.setup(MOTOR_A1, GPIO.OUT) GPIO.setup(MOTOR_A2, GPIO.OUT) GPIO.setup(MOTOR_A3, GPIO.OUT) form = cgi.FieldStorage() recieve = form.getvalue('name') if recieve == 'hhhhh': GPIO.output(MOTOR_A1, GPIO.HIGH) print('Content-type: text/html\n') print(recieve) elif recieve == "kkkk": GPIO.output(MOTOR_A2, GPIO.HIGH) print('Content-type: text/html\n') print(recieve) elif recieve == "jjjj": GPIO.output(MOTOR_A3, GPIO.HIGH) print('Content-type: text/html\n') print(recieve) elif recieve == "ssss": GPIO.output(MOTOR_A1, GPIO.LOW) GPIO.output(MOTOR_A2, GPIO.LOW) GPIO.output(MOTOR_A3, GPIO.LOW) print('Content-type: text/html\n') print(recieve) |
これでRaspberry Pi側の設定はOKです。
使用したGPIOピンからmicro:bitの入力端子0~2とGNDをケーブルで接続します。
micro:bit
micropython
|
1 2 3 4 5 6 7 8 9 10 11 12 13 14 15 16 17 18 19 20 21 22 23 24 25 26 27 28 29 30 |
from microbit import * import time while(True): while(True): if pin0.read_digital() == 1: display.show(Image.HEART) time.sleep(1) display.show(Image.HEART_SMALL) time.sleep(1) else: break while(True): if pin1.read_digital() == 1: display.show(Image.DIAMOND) time.sleep(1) display.show(Image.DIAMOND_SMALL) time.sleep(1) else: break while(True): if pin2.read_digital() == 1: display.show(Image.SQUARE) time.sleep(1) display.show(Image.SQUARE_SMALL) time.sleep(1) else: break display.show(Image.HAPPY) |
完成
ブラウザのボタンクリックでmicro:bitのドットマトリックスを制御が可能になりました。↓
次回は無線通信での制御や、センサーを利用した制御などを試してみたいと思います。


